Cold mornings and icy commutes are common in Spring Park, MN. But there’s nothing worse than turning the key and hearing silence instead of an engine starting. When that happens, your alternator might be to blame.
For local drivers, learning the tools needed for alternator repair can make all the difference between a quick fix and a costly breakdown. It’s not just about having a wrench set — it’s about using the right tools to diagnose and repair electrical issues safely.
Whether you’re parked near Lake Minnetonka or heading into town, the right repair tools can keep your alternator — and your day — running smoothly.
What Are the Tools Needed for Alternator Repair?
Alternator repair involves removing, testing, and reinstalling parts of your car’s charging system. The job requires specific tools designed to handle tight spaces and electrical components safely.
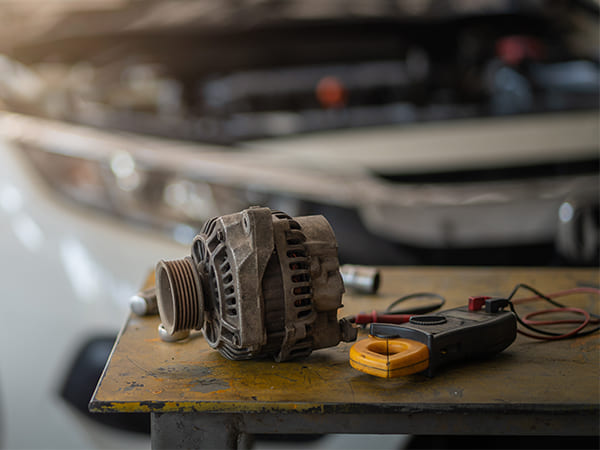
Here’s a complete list of alternator repair tools every DIY mechanic or technician should have:
Socket Set and Ratchet Wrench
A socket set allows precise removal of bolts that secure the alternator. Choose both metric and standard sizes. Use a ratchet wrench with an extension for better reach around engine components.
Serpentine Belt Tool
This tool releases tension on the drive belt so you can remove it without damaging pulleys. Many vehicles, including the Toyota Camry and Chevy Silverado models, require this step before alternator removal.
Digital Multimeter
A multimeter measures voltage output. Test across the battery terminals while the engine is running. A healthy alternator produces 13.5–14.5 volts. Anything less indicates a charging issue.
Pry Bar
Use a small pry bar to loosen the alternator from the tight mounting brackets. This helps align the new alternator during reinstallation.
Torque Wrench
A torque wrench ensures all bolts are tightened to manufacturer specifications. Over-tightening can strip threads; under-tightening causes vibration and noise.
Battery Terminal Puller
This tool safely removes the battery cables without damaging posts or connectors. Always disconnect the negative terminal first.
Protective Gear
Gloves and safety goggles are non-negotiable. They prevent electrical burns and protect from debris or sharp components.
Why These Tools Matter in Spring Park, MN
Spring Park’s climate impacts alternator performance. Winters bring moisture and salt, leading to corrosion. Summer heat stresses electrical systems. Local drivers on Shoreline Drive often experience charging problems after cold snaps or long commutes near Lake Minnetonka.
Having the right alternator repair tools ensures you can handle these seasonal challenges. Even minor voltage loss can affect headlights, infotainment systems, and power steering in modern vehicles.
How to Use Alternator Repair Tools Safely
Step 1: Disconnect the Battery
Always start by removing the negative battery cable. This prevents electrical shock or short circuits.
Step 2: Remove the Serpentine Belt
Use a belt tensioner or serpentine belt tool. Release tension and slide the belt off the alternator pulley.
Step 3: Unbolt the Alternator
Use a ratchet and socket to remove mounting bolts. Support the alternator as you loosen the last bolt to prevent dropping it.
Step 4: Test with a Multimeter
Before replacing, test the alternator. Attach the multimeter leads to the output terminal and ground. Low voltage readings confirm alternator failure.
Step 5: Install the New Alternator
Position the alternator and hand-tighten bolts. Use a torque wrench for final tightening. Reinstall the belt and reconnect the battery.
Case Study: Quick Alternator Fix in Spring Park, MN
Mark, a Spring Park resident, noticed his Subaru Forester stalling at stoplights. At first, he blamed the battery, but testing showed the alternator was the real issue.
Technicians used:
- A multimeter to measure voltage (only 11.8 volts detected)
- A torque wrench to secure the new alternator
- Proper mounting tools for safe alignment and tightening
Outcome: After the repair, voltage returned to normal, and Mark’s vehicle ran reliably again — proof that using the right tools needed for alternator repair makes all the difference.
Expert Insights on Alternator Reliability and Maintenance
- Industry experts from ASE recommend testing alternator voltage regularly and using calibrated tools like torque wrenches and multimeters to prevent early failure.
Source: ASE - The NHTSA advises routine checks of vehicle electrical systems to maintain safe operation, especially in cold-weather areas.
Source: NHTSA Vehicle Maintenance & Safety
Key Points:
- Alternators typically show wear between 60,000–100,000 miles.
- Regular voltage and connection checks reduce breakdown risks in Minnesota’s changing weather.
Common Alternator Issues That Require the Right Tools
- Corrosion: Salt and moisture from Minnesota winters cause corrosion on terminals and brackets.
- Loose Belts: Without proper tensioning tools, alternator belts slip and squeal.
- Low Output: Faulty diodes or regulators reduce charging voltage.
- Mounting Vibration: Incorrect torque settings lead to rattling or premature bearing wear.
Using the correct tools needed for alternator repair prevents these issues from recurring.
Seasonal Maintenance Tips for Spring Park Drivers
- Winter: Keep terminals clean and dry. Test the alternator output monthly.
- Spring: Inspect for belt wear from salt exposure. Replace corroded hardware.
- Summer: Check for overheating and ensure belt tension.
- Fall: Verify output voltage before cold weather begins.
Local mechanics often note that alternators fail right after the first major temperature shift of the season. Regular maintenance reduces that risk.
Benefits of Having the Right Alternator Repair Tools
- Accurate Diagnosis: Multimeters confirm voltage problems before unnecessary part replacements.
- Faster Repairs: Specialized tools reduce time spent on belt removal and mounting.
- Improved Safety: Proper gear prevents electric shock or damage.
- Extended Vehicle Life: Correct torque and alignment minimize strain on engine components.
When it comes to alternator repairs, tools equal precision — and precision equals reliability.
Reliable Alternator Repair Services
Understanding the right tools needed for alternator repair helps keep your vehicle reliable through Minnesota’s changing weather.
At Certified Auto Repair in Spring Park, MN, ASE-certified technicians provide alternator replacement, charging system diagnostics, and belt or battery service, all backed by a 2-Year/24,000 Mile Guarantee.
Need help fast? Schedule an inspection or request a quote today to keep your car starting strong every time.
Next up: Don’t miss our upcoming post — “How to Safely Remove an Alternator in Spring Park, MN.”
Frequently Asked Questions
Here are common questions Spring Park drivers ask about alternator repairs and equipment:
What’s the most important tool for alternator repair?
A digital multimeter. It verifies if the alternator produces the correct voltage and helps confirm whether replacement is necessary.
Can I change an alternator without a torque wrench?
It’s not recommended. Bolts tightened incorrectly can lead to vibration or alignment issues that shorten alternator life.
How do I test my alternator at home?
Start your car and use a multimeter to measure battery voltage. A reading below 13 volts means the alternator isn’t charging properly.
Why does my alternator keep failing?
Common causes include poor electrical connections, loose belts, and incorrect installation torque. Using the proper tools prevents repeat failures.
Do alternators fail more often in cold weather?
Yes. Cold starts demand more power, and moisture increases corrosion risk. Regular testing during winter helps catch issues early.